Raspberry Pi Development Flow
As part of my grand plan to introduce my kids to programming and having fun while self-isolating, I decided to get into the world of Raspberry PI projects. While reading many of the fantastic project how-tos and tutorials that are available, I didn’t see much out there related to an optimal development flow.
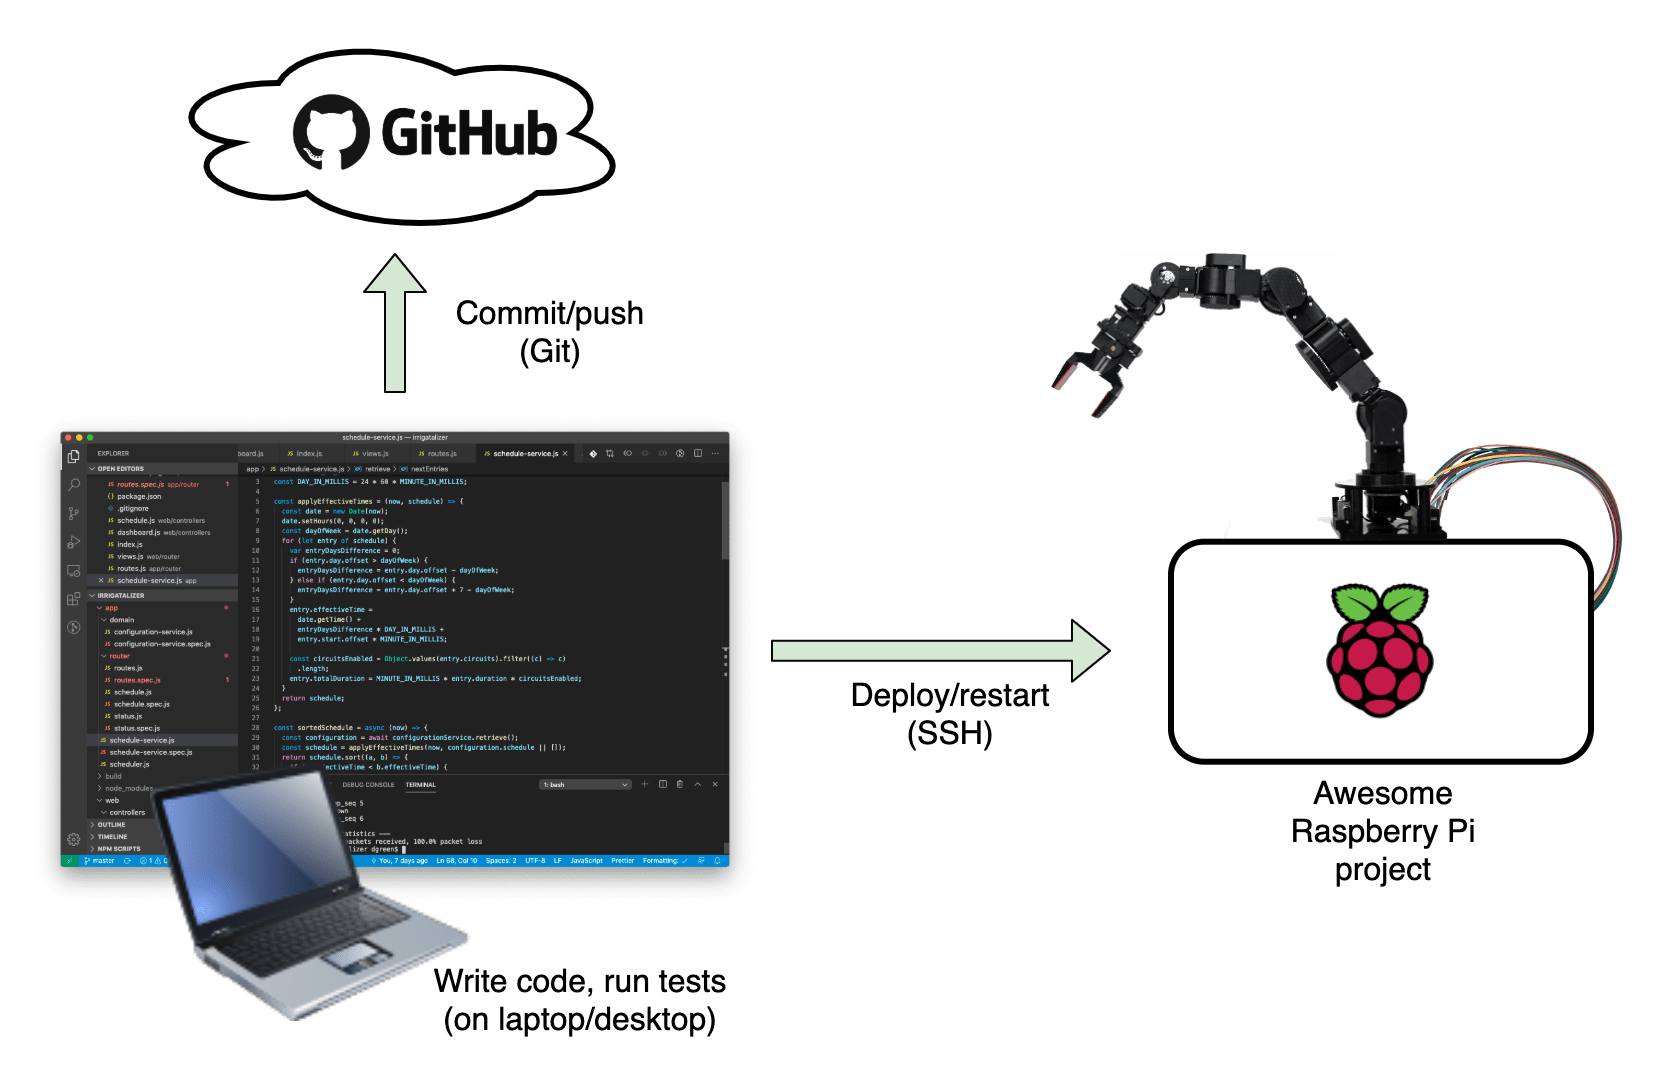 Development flow for the Raspberry Pi
What is an optimal development flow? To me, it is the setup that enables you to rapidly experiment with changes.
The key here is “rapid”. An optimal development flow includes a very fast feedback loop, so that you know whether your changes are producing the desired result. If you can make 20 changes in an hour, your rate of learning will be much, much faster (for example) than 2 or 3 changes in an hour.
To enable a rate of change that fast, you’ll need to automate as much as possible to reduce the friction of deploying and trying out your changes. That way, not only will you be able to deploy and test more quickly, but the cognitive load will be greatly reduced so that your brain can stay focused on moving your project forward.
Here are the main elements that make up a great development flow:
Coding
Write code on your main development machine, i.e. not the Raspberry Pi. Yes, the Raspberry Pi 4 can run like a desktop - but it’s nowhere near as fast as a good development machine. Develop on the machine that runs fast, has a familiar keyboard and mouse/trackpad, and all of your usual development tools.
Having a develoment setup separately from the Raspberry Pi also makes it easy to finetune your development tools for multiple Raspberry Pi projects.
Code Editor or IDE
Choose a code editor or IDE that is optimal for the kind of development that you’re doing. At a minimum, it should have syntax highlighting for your language of choice, enable writing/running tests, and integrate with your source control. For me, this is usually Visual Studio Code.
Source Control
If you haven’t already, it’s worth learning how to use Git and GitHub. You’ll never have to worry about code backups again, and you’ll have a timeline of changes to your code that will make it easy to track down when a bug was introduced, or roll back to a point in time if needed.
Deployment
If you’re not writing your code on the Raspberry Pi (don’t) then you’ll need a way to get your changes there. The best way is to use SSH to copy your files there. SSH will even enable you to run commands remotely, so that you can build, run and restart your project.
Automation
Whether you’re developing on a Mac, Linux or Windows machine, make sure that you have a way to automate your deployments. For me that means having a reasonable terminal (bash or zsh) that will enable you to script your deployments. Ideally you’ll have a single script that will build, deploy and restart your project on your Raspberry PI from your development machine.
A Typical Cycle In My Development Flow
A typical cycle looks something like this:
- Make changes to the code in VS Code
- Write some tests to make sure that it works
- Deploy to the Raspberry Pi:
$ ./deploy.sh - Verify that the the changes produced the desired result on the Raspberry Pi
- Commit and push to GitHub
git commit -m 'some message' && git push - Rinse and repeat
Notice that there is:
- no manual backup of the code
- no worrying about backing up files or settings, or anything on the Raspberry Pi
- no messing around copying files
- no multi-step processes
Next Steps
To automate anything on your Raspberry Pi, you’ll want to have SSH setup. See Raspberry Pi SSH Setup for detailed steps describing how to do that.
Recent Posts
- Flutter Maps With Vector Tiles
- Raspberry Pi SSH Setup
- Raspberry Pi Development Flow
- Troubleshooting Android App Crash on Chromebook
- Article Index
subscribe via RSS